
Kombucha, an effervescent fermented tea, has surged in popularity for its unique flavor and health benefits. Originating from East Asia, this ancient beverage is crafted by fermenting sweetened tea with a culture of bacteria and yeast, commonly referred to as SCOBY. In this guide, we’ll show you step-by-step how to brew kombucha at home, ensuring a delicious and healthy result.
Understanding the Kombucha Brewing Process
The Science Behind Fermentation
The brewing of kombucha is a fascinating two-stage fermentation process. In the first stage, the yeast components of the SCOBY metabolize the sugars in tea to produce ethanol and carbon dioxide. Concurrently, the bacteria in the SCOBY convert the ethanol into acetic acid. This not only imparts kombucha with its characteristic tangy flavor but also produces an array of probiotics, enzymes, and vitamins that contribute to the beverage’s health-promoting qualities.
The Role of SCOBY
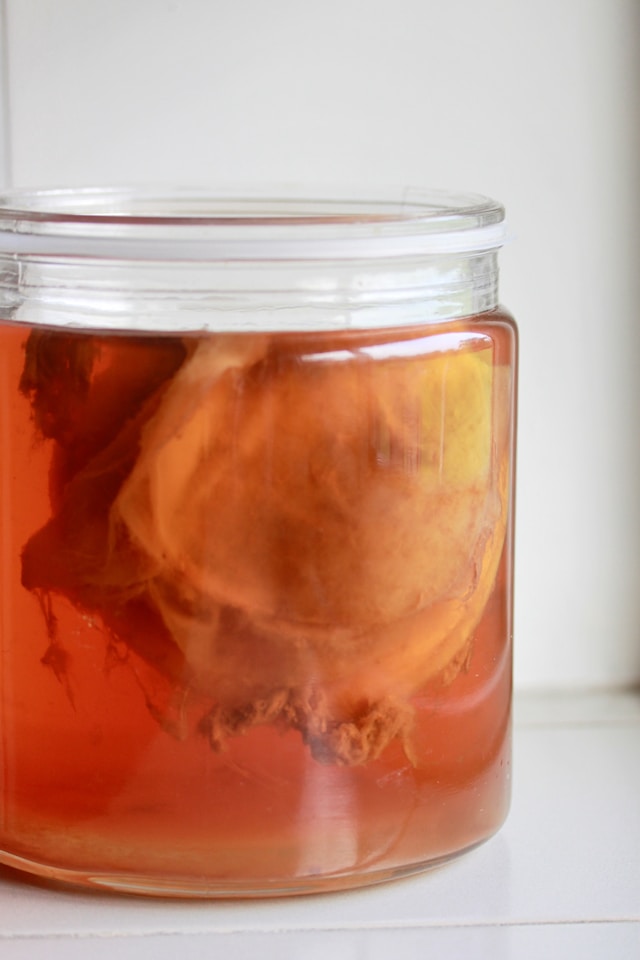
The SCOBY, which resembles a rubbery pancake, is the cornerstone of kombucha brewing. It serves multiple critical functions:
- Protective Barrier: It acts as a natural barrier, protecting the sweet tea from airborne contaminants while it ferments.
- Microbial House: It houses a complex community of bacteria and yeast necessary for the fermentation process.
- Health Indicator: The health and growth of a SCOBY can provide insights into the overall health of the kombucha brew.
A healthy SCOBY is generally cream to light tan in color, firm and smooth in texture. Over time, as the fermentation process progresses, the SCOBY will grow thicker as new layers form, which can be used to start new batches of kombucha or shared with other brewing enthusiasts.
Essential Ingredients for Brewing Kombucha
Tea Selection
Choosing the right type of tea is crucial for both flavor and the health of the SCOBY. True tea (Camellia sinensis)—black, green, white, or oolong—is required. Herbal, rooibos or flavored teas may contain oils or additives that inhibit SCOBY growth or taint flavor. Here are the best types of tea for brewing kombucha:
- Black Tea: Known for its robust flavor, black tea also provides nutrients that are beneficial for the SCOBY.
- Green Tea: Lighter in flavor and rich in antioxidants, green tea can also be used to brew kombucha, offering a different taste profile.
- Oolong Tea: This mixed tea blend falls in between green and black, providing a flavor balance.
- White Tea: Known for its delicate flavors, white tea can be used for a subtler kombucha, although it may require a slightly longer fermentation period.
It’s important to avoid teas that contain oils or artificial flavors, as these can disrupt the fermentation process and potentially damage the SCOBY.
Sugar Types and Their Effects
Sugar is a vital ingredient in kombucha brewing, serving as the primary food source for the yeast. White cane or beet sugar is ideal. Avoid raw sugars (turbinado, muscovado) or sugar substitutes; they don’t feed the SCOBY predictably.
Artificial sweeteners and sugar substitutes should be avoided as they do not provide the necessary nutrients for fermentation.
Water Quality
The quality of water used in brewing kombucha can significantly impact the final product. Chlorine, fluoride, and other chemicals typically found in tap water can inhibit the SCOBY and affect the flavor of your kombucha. It’s best to use filtered or spring water to ensure the purity of the water. If tap water must be used, it should be left out overnight to allow the chlorine to evaporate.
Necessary Equipment
A few key pieces of equipment are necessary for brewing kombucha:
- SCOBY: Obtain a healthy SCOBY from a previous batch, a trusted friend, or a reputable online source.
- Brewing Vessel: A wide-mouth glass jar is ideal for brewing kombucha. Metal containers should be avoided as they can react with the acidic kombucha, and certain types of ceramics might leach unwanted chemicals. For a typical batch, a jar with a capacity of 1 to 2 gallons (4 to 8 liters) is recommended. This size allows enough space for the SCOBY to grow and for the tea to ferment properly.
- Covering: A tightly woven cloth or coffee filter is needed to cover the brewing vessel, securing it with a rubber band to protect against contaminants.
- Bottles for Secondary Fermentation: Use airtight containers that can withstand the build-up of carbonation. Flip-top glass bottles are preferred.
- Other Tools: A large spoon or ladle for stirring, a funnel for bottling, pH strips for testing acidity, and a thermometer to monitor the temperature are also useful.
How to Brew Kombucha: Step-by-Step Guide
Before brewing, make sure to clean and sanitize all of your equipment and your hands. This means washing with hot water and detergent, and rinsing with near-boiling water or using a food-grade sanitizer like Star San or diluted bleach.
Preparing the Sweet Tea Base
- Boil Water: Begin by boiling a gallon of water. Once it reaches a boil, remove it from heat and add to your brewing vessel.
- Steep Tea: In your brewing vessel, add 5 g of tea per cup of water (≈70 g per gallon). Allow the tea to steep for 5-7 minutes.
- Add Sugar: While the tea is still hot, add 1 cup of sugar per gallon. Stir until the sugar is completely dissolved.
- Cool Down: Let the sweetened tea cool to room temperature, between 68-85°F (20-30°C). This is crucial as hot temperatures can harm the SCOBY.

Adding the SCOBY and Starter Tea
- Add Starter Tea: Add approximately 2 cups of starter tea per gallon of new tea (≈10% of brew volume). This starter tea should come from a previous batch of kombucha or from a store-bought unflavored kombucha, which helps to acidify the brew and prevent unwanted bacteria growth.
- If you don’t have enough starter kombucha, you can add ¼ cup distilled vinegar to each gallon of sweet tea to drop the pH below 4.5 and ward off unwanted microbes.
- pH target: Note that your sweet tea should hit about pH 4.2–4.5 before adding the SCOBY. Finished kombucha should be 2.5–3.5.
- Place the SCOBY: Gently place the SCOBY on top of the liquid in the brewing vessel. The SCOBY may float, sink, or even stand sideways—this is perfectly normal.
- Cover and Secure: Cover the jar with a tightly woven cloth or coffee filter and secure it with a rubber band to keep out contaminants.
First Fermentation Process
This stage is where the magic happens and sweet tea turns into tangy kombucha. Here’s how to handle the first fermentation:
- Store the Vessel: Place your brewing vessel in a warm, dark place away from direct sunlight and drafts, like a kitchen cupboard or pantry shelf.
- Monitor Temperature: Keep the temperature consistent, ideally between 75-85°F (20-30°C). The right temperature is crucial as too cool an environment slows down the fermentation, whereas too warm can lead to off-flavors or excessive yeast growth.
- Fermentation Duration: Allow the kombucha to ferment for 7-10 days. This timeframe can vary based on several factors including ambient temperature, the amount of sugar, and your personal taste preferences.
- Check the Brew: During fermentation, it’s important to monitor the progress of the brew. Look for signs like the formation of a new SCOBY layer on the surface, a gradual change from a sweet to a vinegary smell, and the appearance of tiny bubbles indicating active yeast fermentation.
- Mold warning: Describe how to spot mold (green, black or white fuzzy spots) versus healthy yeast strands (tan, stringy). Any mold means discard the batch and SCOBY.
Start tasting your kombucha after about 5 days using a sanitized straw or spoon to take a sample from beneath the SCOBY. This not only allows you to check the flavor balance between sweetness and acidity but also introduces a small amount of oxygen into the brew, which can help prevent mold growth.
If the kombucha is too sweet, allow it to ferment for a longer period. If it becomes too sour, the fermentation has gone too long, but the kombucha is still usable, often enjoyed as a vinegar substitute in dressings and marinades.
For a more scientific approach, you can use pH strips to monitor the acidity of your kombucha. The ideal pH level for finished kombucha is between 2.5 and 3.5, ensuring the brew is acidic enough to be safe from harmful microbes and palatable.
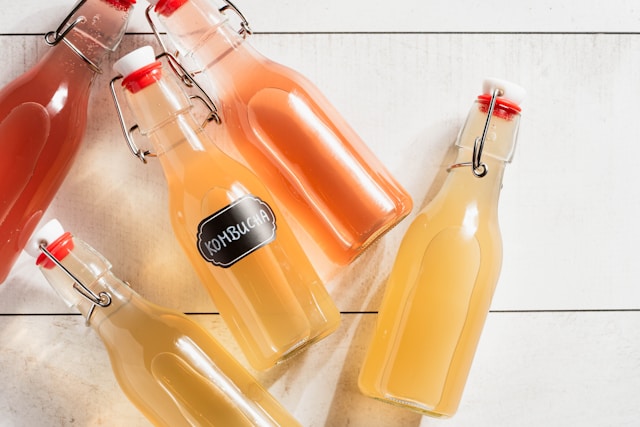
Bottling for Second Fermentation
With the first fermentation complete, it’s time to bottle the kombucha for its second fermentation, which develops flavor and carbonation.
- Wash Your Hands: Clean your hands and rinse with vinegar to prevent any contamination.
- Remove the SCOBY: Carefully lift and remove the SCOBY layers from your brewing vessel.
- Set Aside Starter Tea: Place the SCOBY in a clean bowl with about a cup of the brewed kombucha. This kombucha serves as your starter tea for the next batch. See more below on how to maintain your SCOBY.
- Stir the Kombucha: Gently stir the remaining kombucha in the brewing vessel to evenly distribute the yeast particles.
- Add Flavors: Add fruits, herbs, and/or spices directly into the bottling bottles for your unique flavor. For example, you might try strawberry-basil, ginger-lemon, blueberry-lavender, pineapple-mint, or apple-cinnamon.
- Bottle the Kombucha: Using a funnel, carefully pour the kombucha into clean bottles.
- Headspace: 1 inch (2–3 cm) of headspace is usually enough for carbonation; more headspace can under‑carbonate, less can over‑pressurize.
- Seal and Store: Securely seal the bottles and store them at room temperature, away from direct sunlight, to allow the second fermentation to proceed. The residual sugars will ferment during this stage, producing carbon dioxide that carbonates the drink and infuses the flavors.
- Observe and Wait: During the second fermentation, keep the bottles at a stable room temperature, ideally between 68-75°F (20-24°C).
- Bottle types: If you use glass swing‑tops, “burp” (open) them once per day to release excess CO₂. If you use plastic, gently squeeze to release pressure.
- This process usually takes 1-3 days, but can vary based on the amount of residual sugar and the ambient temperature.
- Refrigerate and Enjoy: Once you’re satisfied with the level of carbonation and flavor, move the bottles to the refrigerator. This halts fermentation and preserves the flavor and fizz.
- Flavor solids: Remove fruits/herbs once desired flavor/carbonation is reached, then refrigerate. Leaving them in too long can lead to over‑sourness.
Storing and Serving Your Kombucha
To maintain the quality of your kombucha, keep the following tips in mind:
- Refrigeration: Store bottled kombucha in the refrigerator to keep it fresh and halt further fermentation.
- Protection from Light: Keep bottles out of direct sunlight as light can degrade the kombucha’s flavor and nutritional content.
- Tight Sealing: Ensure the bottles are tightly sealed to maintain carbonation.
Homemade kombucha can be stored in the refrigerator for 1-3 months. However, it will continue to ferment very slowly, becoming gradually more acidic over time.
Maintaining Your SCOBY
Proper care and maintenance of your SCOBY ensure that it continues to produce high-quality kombucha. Here are essential tips for keeping your SCOBY healthy:
- Cover the Bowl: Protect the SCOBY and starter tea from contaminants by covering the bowl with a clean cloth or a paper towel and securing it with a rubber band.
- Store the SCOBY:
- Short‑term storage: If you plan to start another batch soon, keep the covered bowl at room temperature for up to a few days.
- Long‑term storage (“hotel”): Keep 1–2 inches of liquid over your SCOBY in a sealed jar at room temp, refreshing with fresh sweet tea or kombucha every 4–6 weeks to provide the SCOBY necessary nutrients for its survival and growth.
- Layer management: Over successive batches, pellicles stack up. Periodically peel off older layers (reserve in your SCOBY “hotel” or compost them).
- Observation: Regularly check the color, texture, and smell of your SCOBY. A healthy SCOBY should be cream to light brown, firm, and have a clean, slightly sour smell.
Troubleshooting Common Kombucha Brewing Issues
Even with careful attention, issues can arise in kombucha brewing. Here are solutions to some common problems:
Dealing with Mold
Mold is a serious concern in kombucha brewing. If you notice any mold growing on your SCOBY or in the brewing vessel, which can appear as fuzzy, green, black, or blue patches, it’s crucial to take immediate action:
- Discard the Batch: Unfortunately, if mold develops, the entire batch, including the SCOBY, must be discarded to avoid health risks.
- Sanitize Everything: Clean and sanitize all brewing equipment and containers before starting a new batch.
- Preventative Measures: To prevent mold, ensure that your brewing environment is clean, that the starter tea is sufficiently acidic, and that the brewing vessel is properly covered.
Addressing Off-Flavors
Sometimes, your kombucha might develop an undesirable taste. Here are adjustments you can make based on common off-flavors:
- Overly Sour: If the kombucha is too tart: reduce the fermentation time, lower the fermentation temperature, blend with freshly brewed sweet tea, or add sweet juice to balance the flavor.
- Too Sweet: Allow the kombucha to ferment longer or combine it with a more acidic batch to achieve the desired balance.
- Too Yeasty: If the brew has a strong yeast flavor, remove some of the yeast strands from the SCOBY and the liquid before starting your next batch.
- Vinegary Taste: If the kombucha tastes more like vinegar than a balanced fermented tea, shorten the fermentation period and check that you’re using the correct amount of sugar.
- Sulfur Smell: An off-putting sulfur odor can indicate contamination or an imbalance in the brewing environment. Review your brewing method to ensure all conditions and proportions are correct.
- Trust Your Gut: If anything doesn’t smell, taste, or seem right, discard the batch, sanitize your equipment, and try again! Remember that trial and error is a natural part of the process.
FAQs on How to Brew Kombucha
How long does it take to brew kombucha?
The entire brewing process typically takes between 1 and 4 weeks. The first fermentation stage usually lasts between 7 and 10 days, while the second fermentation can take from 1 to 3 days. However, these times can vary depending on the temperature and your taste preferences.
Can I use herbal tea for making kombucha?
Herbal teas do not provide the necessary nutrients for the SCOBY. It is recommended to use true tea as the base for the majority of your brew to maintain a healthy SCOBY. You can experiment with flavors by adding a small proportion of herbal tea to your blend when you infuse it with other flavors like fruits and juices.
Can I flavor my kombucha during the first fermentation?
It is best to add flavors during the second fermentation to avoid compromising the health of your SCOBY. Adding ingredients like fruits or herbs in the first fermentation can introduce contaminants and affect the SCOBY’s ability to ferment properly.
How long can I store my homemade kombucha?
When stored properly in the refrigerator, homemade kombucha can last for 1 to 3 months. It will continue to ferment very slowly, becoming more acidic over time.
What should I do with extra SCOBYs when brewing Kombucha?
Extra SCOBYs can be stored in a SCOBY hotel, which is simply a container filled with sweet tea where the SCOBYs can live. This allows you to have backup cultures ready for new batches, share with friends, or experiment with different brewing conditions.
Can I use metal utensils or containers when brewing kombucha?
It is best to avoid using metal with kombucha, especially for long-term storage, as the acidic nature of kombucha can react with metal and contaminate your brew. Stick to glass, ceramic, or wood for brewing vessels and utensils. Check out our curated guide to kombucha starter kits if you need a little more help for your first brew.
Does kombucha contain alcohol?
Kombucha naturally contains a small amount of alcohol, usually between 0.5% and 2% ABV, due to the fermentation process. This content can vary with the length of fermentation and the sugar content used.
Managing Alcohol Levels: To reduce the alcohol content, shorten the fermentation time, use less sugar, and refrigerate your kombucha promptly after the second fermentation.
Resources for Further Learning
To dive deeper into the art and science of kombucha brewing, consider exploring the following resources:
YouTube
- You Brew Kombucha: This channel features step-by-step video tutorials and troubleshooting tips for making perfect kombucha at home.
- Pro Home Cooks – Offers a beginners guide to kombucha fermentation
Books
“The Big Book of Kombucha” by Hannah Crum and Alex LaGory. This comprehensive guide covers everything you need to know about brewing kombucha, including recipes, troubleshooting tips, and the history of this fermented tea.
“Kombucha Revolution” by Stephen Lee. A practical guide that offers inventive recipes and expert advice on how to brew kombucha and incorporate it into a healthy lifestyle.
“True Brews” by Emma Christensen. This book provides easy-to-follow instructions for brewing kombucha along with other homemade drinks like beer, mead, and cider.
Websites
- Cultures for Health: A comprehensive resource offering recipes, tutorials, and high-quality cultures for kombucha and other fermented foods.
- Kombucha Kamp: This site provides in-depth guides, equipment, and expert advice on brewing kombucha at home.

Takeaway: Get Started Brewing Today
Learning how to brew kombucha at home is an enriching experience that merges science with creativity. As you progress in your brewing journey, you will develop a deeper understanding of the fermentation process and enjoy the flexibility to experiment with different flavors and techniques.
So, gather your materials, start your first batch, and embark on your own kombucha brewing adventure. With patience and practice, you’ll soon be crafting delicious, probiotic-rich kombucha that can rival any commercial brand. Happy brewing!
Share your experiences, discoveries, and even the occasional mishap below in the comments and subscribe to the Gorilla Gazette newsletter for kombucha tips and more delivered to your inbox.
More from Bananomad
- Learn practical methods for maintaining sobriety—from creating a strong support network to establishing healthy daily habits.
- Explore how daily mindfulness can benefit your skin—lowering stress, boosting its natural glow, and supporting overall skin health.
- Learn the benefits of dead hangs: boost grip strength, improve posture, and reduce back pain.
Leave a Reply